

After building a few projects, I am now comfortable writing APIs in .NET. I’ve built basic CRUD endpoints, used third-party APIs, used Redis for caching, and used Identity Core to protect my endpoints, as well as implementing my own sessions-based authentication.
The natural next step would be learning to implement JWTs.
In this article, I give you a quick overview of what a JWT is, the difference between session-based authentication, and when to use each one before diving into how I implemented JWT in a new .NET web API project, complete with refresh token rotation and revocation.
This article is part of the 20 Backend Projects series.
What is JWT
A JSON Web Token (JWT) is an open standard (RFC 7519) that defines a self-contained compact way for securely exchanging claims between two systems (jwt.io, sophos.com). JWTs are digitally signed, and contains all the necessary information a server would need to process a request. Because of this, they are a popular authorization method amongst modern and distributed applications.
A JWT has three (3) parts:
- header
- payload
- signature
and in this format:
header.payload.signatureHere is a glance of what a typical JWT looks like:
JWT
eyJhbGciOiJIUzI1NiIsInR5cCI6IkpXVCJ9.eyJzdWIiOiIxMjM0NTY3ODkwIiwibmFtZSI6IkpvaG4gRG9lIiwiYWRtaW4iOnRydWUsImlhdCI6MTUxNjIzOTAyMn0.KMUFsIDTnFmyG3nMiGM6H9FNFUROf3wh7SmqJp-QV30Decoded Header
{
  "alg": "HS256",
  "typ": "JWT"
}
Decoded Payload
{
  "sub": "1234567890",
  "name": "John Doe",
  "admin": true,
  "iat": 1516239022
}
Signature (the last part of the token)
KMUFsIDTnFmyG3nMiGM6H9FNFUROf3wh7SmqJp-QV30You can also visit jwt.io to try out their JWT Debugger which is what I use.

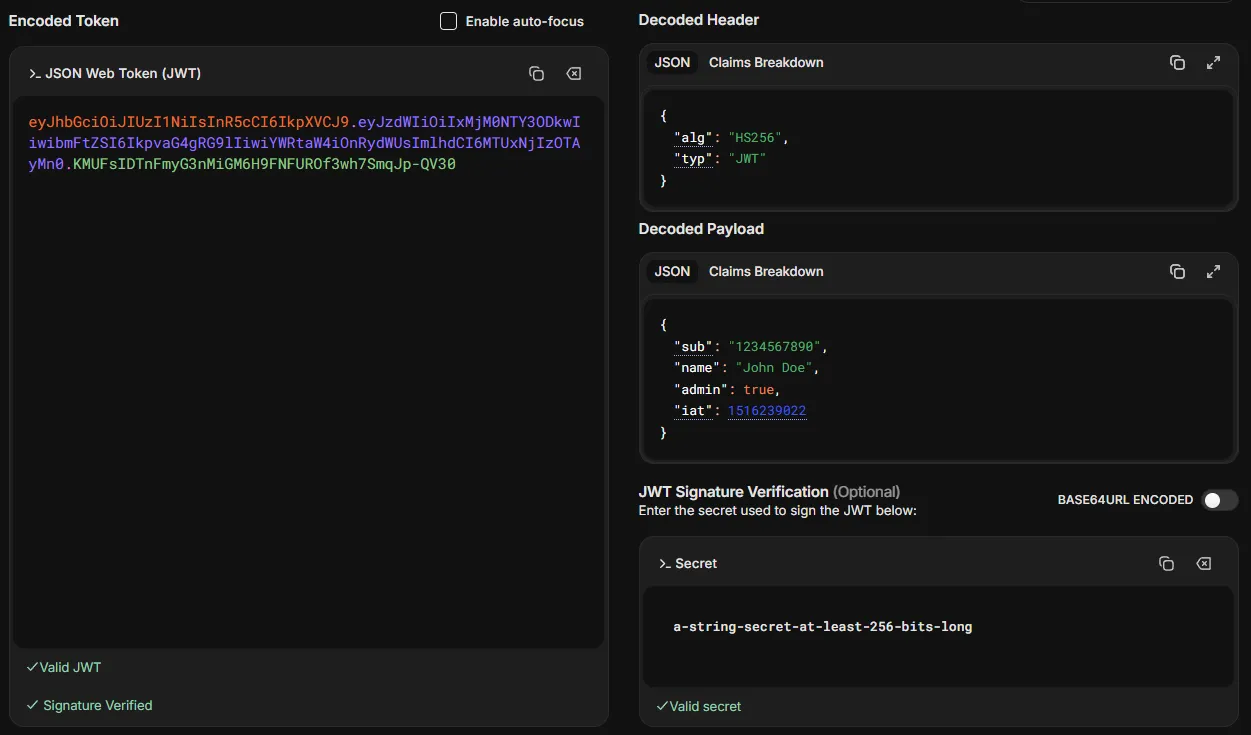
JWT vs Session-Based Authorization
The more correct terminology is Stateless vs Stateful Based Authentication. JWTs are stateless and are not stored in the server (we’ll talk about refresh tokens in a bit), while stateful-based authentication stores sessions and other information in the server.
In a typical application, JWTs also stores sessions server-side. There are two types of tokens in the JWT open standard:
- Access tokens
- Refresh tokens
A big problem with JWTs is that since you cannot store them in the server, there is no way to invalidate a token unless it expires. If a malicious actor gets hold of a valid JWT, they can keep using that indefinitely until the token expires.
A way to mitigate this is to have them be very short-lived or have a short time-to-live (TTL), such as 5 minutes. But requiring users to login every 5 minutes is just bad user experience.
Refresh Tokens
Refresh tokens are a way to keep access tokens short-lived, while allowing legitimate users from not having to authenticate every 5 minutes (or however long your access token expirations are). They are stored on the server, thus allowing for invalidation.
Refresh tokens have longer expirations, are rotated upon every request, and are paired with access tokens. There are 3 scenarios when a client tries to refresh an access token:
-
The refresh token is valid. If the refresh token is not expired and has not been revoked, then the server hands out a new access and refresh token, and revokes the old refresh token.
-
The refresh token has expired, but has not been revoked. In this case, the refresh token has reached the end of its TTL, but it has not been revoked. Typically, the server will ask the client to authenticate again. All refresh tokens belonging to that client will be revoked, and a new access and refresh token will be handed out.
-
The refresh token has been revoked. When a request tries to refresh an access token using a refresh token that has already been revoked, the server treats it as a compromised token. It immediately revokes/invalidates all refresh tokens belonging to that client, and ask the user the authenticate again.
A compromised access token, however, is a different thing. Since they are not stored in the server, there is no way to “revoke” these tokens, except until it expires. That is why having a very short TTL is important, and use refresh tokens with a longer TTL to handle revocation and invalidation.
When should you use JWT and when should you stick to session-based authentication
Depending on your application, there are cases where choosing one over the other is the better option.
Generally, if your application is monolithic or is not split into multiple microservices, session-based authentication/authorization (authn/z) is the recommendation. Since these apps are not making calls to a distributed architecture or several third-party services where authn/z is essential, session-based is the go-to. Additionally, if your application does not handle very high throughput, or in low-stakes environment where speed and latency are not extremely essential (emphasis on extremely).
However, if your application’s architecture is split into several microservices, or if you have high throughput and need to minimize database and round trip calls, then JWTs are the better option. JWT is a great solution since calling a service does not require a call to the database each time. Each token is self-contained and has all the necessary information needed to process that request, thus minimizing a lot of “hoops”. This also makes it perfect for systems that requires high-speed latencies and high throughput.
So now, I’ve given you a brief overview of JWT, the difference between stateless tokens and stateful sessions, and when to use each one.
Here is how I started learning how to implement them in my APIs (this is also the first time I’m implementing them).
Project Overview and how JWT Fits in
I’ve built a lot of REST APIs by now, but this is the first time I’ll be implementing JWT.
To give you an overview of the project, it is a simple expense tracker API. Using this API, we will put the endpoints behind a JWT authn/z scheme, checking first for access and claims before gaining access to resources in the API.
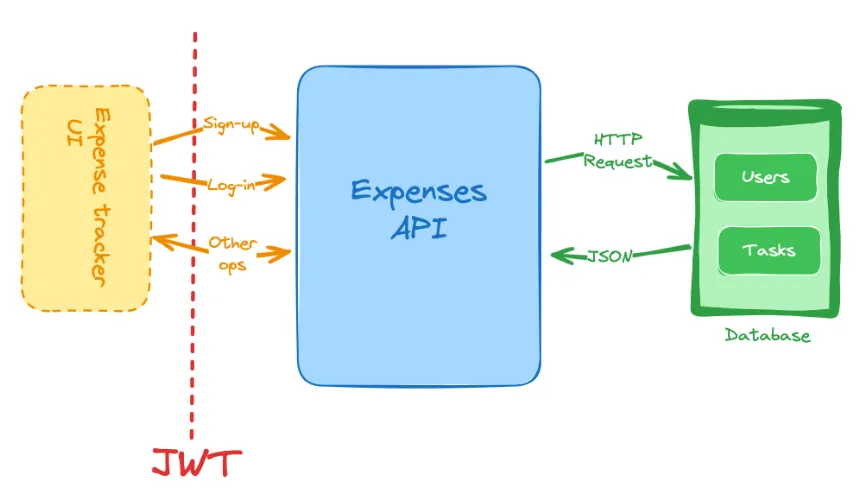 photo from 20 Backend Project Ideas
We will also implement refresh tokens, as well as rotation, and revocation.
The expense API is trivial at this point. So for this project, I really wanted to focus on the JWT part. We will not be going over the expense tracker part of this project.
Setting up the .NET Project
Let’s begin with setting up a new webapi project using .NET 10:
dotnet new webapi -o ExpenseTrackerAPIPackages
We then install all the necessary packages for this project, such as the password hashing algorithm, JWTBearer, EF Core, Npgsql for PostgreSQL, and OpenAPI & Scalar for documentation.
dotnet add package Isopoh.Cryptography.Argon2
dotnet add package Microsoft.AspNetCore.Authentication.JwtBearer
dotnet add package Microsoft.AspNetCore.OpenApi
dotnet add package Microsoft.EntityFrameworkCore
dotnet add package Microsoft.EntityFrameworkCore.Design
dotnet add package Npgsql.EntityFrameworkCore.PostgreSQL
dotnet add package Scalar.AspNetCore
Your .csproj file should contain all these packages after installing.
<ItemGroup>
    <PackageReference Include="Isopoh.Cryptography.Argon2" Version="2.0.0" />
    <PackageReference Include="Microsoft.AspNetCore.Authentication.JwtBearer" Version="10.0.12" />
    <PackageReference Include="Microsoft.AspNetCore.OpenApi" Version="10.0.12" />
    <PackageReference Include="Microsoft.EntityFrameworkCore" Version="10.0.12" />
    <PackageReference Include="Microsoft.EntityFrameworkCore.Design" Version="10.0.12">
      <IncludeAssets>runtime; build; native; contentfiles; analyzers; buildtransitive</IncludeAssets>
      <PrivateAssets>all</PrivateAssets>
    </PackageReference>
    <PackageReference Include="Npgsql.EntityFrameworkCore.PostgreSQL" Version="10.0.3" />
    <PackageReference Include="Scalar.AspNetCore" Version="2.17.14" />
</ItemGroup>
Project Structure
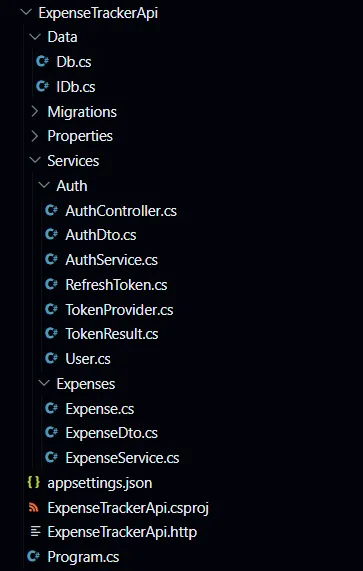
Here, I grouped files and services by feature, and not by type. I learned this from Milan Jovanić on YouTube.
GitHub Setup
Finally, we make a new branch in my existing backend projects repository and push the first commit to the remote repository.
git checkout -b ExpenseTrackerApi
git add .
git commit -m 'initial commit'
git push -u origin ExpenseTrackerApi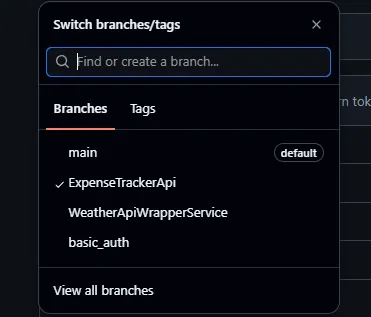
After that, we should be setup and good to go.
Implementing JWT
Now that our project is setup, we can now start implementing JWT in our .NET API.
Token Provider
We will begin by creating a class named token provider, which will contain two methods:
- one for generating an access token
- and one for generating a refresh token
CreateAccessToken
public string CreateAccessToken(User user)
{
    // multiple projects share the same secrets space, hence the project prefix
    var secretKey = config["ExpenseTrackerApi:Jwt:SecretKey"]
        ?? throw new InvalidOperationException("JWT SecretKey is not configured in app settings");
    var securityKey = new SymmetricSecurityKey(Encoding.UTF8.GetBytes(secretKey));

    var credentials = new SigningCredentials(securityKey, SecurityAlgorithms.HmacSha256);

    var tokenDescriptor = new SecurityTokenDescriptor
    {
        Subject = new ClaimsIdentity([
            new Claim(JwtRegisteredClaimNames.Sub, user.Id.ToString()),
            new Claim(JwtRegisteredClaimNames.Email, user.Email),
            new Claim("username", user.Username),
        ]),
        Expires = DateTime.UtcNow.AddMinutes(
            config.GetValue<int>("ExpenseTrackerApi:Jwt:AccessTokenExpirationMinutes")),
        SigningCredentials = credentials,
        Issuer = config["ExpenseTrackerApi:Jwt:Issuer"],
        Audience = config["ExpenseTrackerApi:Jwt:Audience"]
    };

    var handler = new JsonWebTokenHandler();
    string token = handler.CreateToken(tokenDescriptor);

    return token;
}
Let’s break this down.
The method consists of three main parts:
- Signing Credentials
- Token Descriptors (headers and payload)
- Token creation and returning the token
var secretKey = config["ExpenseTrackerApi:Jwt:SecretKey"]
            ?? throw new InvalidOperationException("JWT SecretKey is not configured in app settings");

var securityKey = new SymmetricSecurityKey(Encoding.UTF8.GetBytes(secretKey));

var credentials = new SigningCredentials(securityKey, SecurityAlgorithms.HmacSha256);
JWTs are tokens that are digitally signed, and we need a secret key which you keep on the server, and the headers and payload to create the signature. We first fetch the secret key from the project configuration/environment and use that to create a Symmetric Security Key. We then use that security key and choose our token signing algorithm — in this case, HmacSha256 — to create our signing credentials.
var tokenDescriptor = new SecurityTokenDescriptor
{
    Subject = new ClaimsIdentity([
        new Claim(JwtRegisteredClaimNames.Sub, user.Id.ToString()),
        new Claim(JwtRegisteredClaimNames.Email, user.Email),
        new Claim("username", user.Username),
    ]),
    Expires = DateTime.UtcNow.AddMinutes(
        config.GetValue<int>("ExpenseTrackerApi:Jwt:AccessTokenExpirationMinutes")),
    SigningCredentials = credentials,
    Issuer = config["ExpenseTrackerApi:Jwt:Issuer"],
    Audience = config["ExpenseTrackerApi:Jwt:Audience"]
};
We then define the contents of our tokens. We have the following, but feel free to add more depending on your application’s needs:
- user_id
- username
- expiration in minutes
- signing credentials
- issuer
- audience
var handler = new JsonWebTokenHandler();
string token = handler.CreateToken(tokenDescriptor);
Then, we create a JsonWebTokenHandler and use that to generate a token, passing in the tokenDescriptor containing all the configuration that were passed in.
return token;Finally, the method returns a plain string, and leaves it up to the service implementing it.
GenerateRefreshToken Method
public string GenerateRefreshToken()
{
    var randomBytes = RandomNumberGenerator.GetBytes(64);
    return Convert.ToBase64String(randomBytes);
}
For the GenerateRefreshToken, 64 bytes of entropy should suffice. It does not need any structure. It just has to be unguessable and virtually computationally impossible to crack.
Storing access and refresh tokens
You would want a way to securely store both the access and refresh tokens, both on the client and the server.
Storing access and refresh tokens client-side
For the client side, we’re storing them via HTTP-only cookies. I create a private method for appending token in the cookies, with specified options for consistency and safety.
It specifies the headers, expiration, cookie options, and the path.
 private static void CookieAppendToken(
    IResponseCookies cookies,
    string header,
    string token,
    int expirationMinutes,
    string path = "/")
{
    var baseOptions = new CookieOptions
    {
        HttpOnly = true,
        Secure = true,
        SameSite = SameSiteMode.Lax,
        Expires = DateTime.UtcNow.AddMinutes(expirationMinutes),
        Path = path
    };

    cookies.Append(header, token, baseOptions);
}
and then I applied it like this:
var result = await _authService.RegisterAsync(request);

if (result.IsSuccess)
{
    CookieAppendToken(Response.Cookies, "accessToken", result.AccessToken, accessTokenExpirationMinutes);
    CookieAppendToken(Response.Cookies, "refreshToken", result.RefreshToken, refreshTokenExpirationMinutes);

    return Ok();
}
else
{
    return Unauthorized(new
    {
        message = "Email or username already exists."
    });
}
And when sending requests on authorized endpoints, I simply append the cookies along with the request.
Storing refresh tokens server-side
Unlike access tokens, refresh tokens are stored server-side.
I create a RefreshToken model like so:
public class RefreshToken
{
    public Guid Id { get; set; }
    public required string TokenHash { get; set; } = string.Empty;
    public required Guid UserId { get; set; }
    public required DateTime Created { get; set; }
    public required DateTime Expires { get; set; }
    public DateTime? Revoked { get; set; }
    public Guid? ReplacedByTokenId { get; set; }
    public bool IsActive => Revoked is null && DateTime.UtcNow < Expires;
}
Note that we also do not store the plain refresh token on the server. We store a hash on the database. When validating a refresh token request, we first hash it using the same algorithm and compare it against the hashed version stored in the database.
You can use any hashing algorithm you want. Here, I used the SHA-256 algorithm.
public DbSet<RefreshToken> RefreshTokens => Set<RefreshToken>();Also don’t forget to create your RefreshToken DbSet in your application’s DbContext.
Registering Token provider
After we have setup the access and refresh tokens, we need to register them in Program.cs.
We first add the TokenProvider as a singleton, and add authorization to our application:
builder.Services.AddSingleton<TokenProvider>();

builder.Services.AddAuthorization();
And then here, we add the JWT Authentication scheme:
builder.Services.AddAuthentication(JwtBearerDefaults.AuthenticationScheme)
    .AddJwtBearer(options =>
    {
        options.RequireHttpsMetadata = false;
        options.TokenValidationParameters = new TokenValidationParameters
        {
            IssuerSigningKey = new SymmetricSecurityKey(
                Encoding.UTF8.GetBytes(builder.Configuration["ExpenseTrackerApi:Jwt:SecretKey"])),
            ValidIssuer = builder.Configuration["ExpenseTrackerApi:Jwt:Issuer"],
            ValidAudience = builder.Configuration["ExpenseTrackerApi:Jwt:Audience"],
            ClockSkew = TimeSpan.Zero
        };

        options.Events = new JwtBearerEvents
        {
            OnMessageReceived = context =>
            {
                if (context.Request.Cookies.TryGetValue("accessToken", out var accessToken))
                {
                    context.Token = accessToken;
                    Console.WriteLine($"[Auth] Token successfully extracted from cookie: {accessToken[..10]}...");
                }
                if (context.Request.Cookies.TryGetValue("refreshToken", out var refreshToken))
                {
                    Console.WriteLine($"[Auth] Refresh token successfully extracted from cookie: {refreshToken[..10]}...");
                }
                else
                {
                    Console.WriteLine("[Auth] 'accessToken or refreshToken' cookie not found in request!");
                }

                return Task.CompletedTask;
            }
        };
    });
This authentication scheme consists of two parts.
First is specifying the JWT options, such as issuer signing key, the valid issuer and audience, and the “restrictiveness” when it comes to expiration. In this case, if a token is expired, it is expired. No exceptions.
options.RequireHttpsMetadata = false;
options.TokenValidationParameters = new TokenValidationParameters
{
    IssuerSigningKey = new SymmetricSecurityKey(
        Encoding.UTF8.GetBytes(builder.Configuration["ExpenseTrackerApi:Jwt:SecretKey"])),
    ValidIssuer = builder.Configuration["ExpenseTrackerApi:Jwt:Issuer"],
    ValidAudience = builder.Configuration["ExpenseTrackerApi:Jwt:Audience"],
    ClockSkew = TimeSpan.Zero
};
The second part lets us pass the JWT within the cookies in a request. It lets us define an event whenever the application receives a message, and how to handle that message.
options.Events = new JwtBearerEvents
{
    OnMessageReceived = context =>
    {
        if (context.Request.Cookies.TryGetValue("accessToken", out var accessToken)
		        && !string.IsNullOrEmpty(accessToken))
        {
            context.Token = accessToken;
        }

        return Task.CompletedTask;
    }
};
Here, we’re specifying an OnMessageReceived event and checking for the cookies “accessToken” in the request headers, and attaching it in the context.Token built specifically for this purpose.
The next time you send a request to a protected endpoint, include an access or refresh token cookie to the header.
We’ve successfully implement JWTs in our .NET application!
Next Steps
Now that we’ve implemented JWT in our application, we can use it as the authentication/authorization scheme on our protected endpoints. In this case, the expense tracker project.
[ApiController]
[Authorize]
[Route("api/expenses")]
For example, for an expense tracker API, we can simply add the [Authorize] attribute to our controller to make it protected, and use our JWT implementation to access resources on those endpoints.
It is worth noting to say that creating your own implementations is a great way to learn, but not so much as actual usage in real production environments or applications with real users and real risks. When implementing authn/z in your applications, consider tried and battle-tested options, such as Identity Core, or other services depending on your needs.
Thank you for reading to the end. Best of luck to you and your learning journey!
Sources: